· Rumtoo Process Team · Technical Guide · 13 min read
From Scrap to Spool: The Complete Filament Recycling Workflow with Desktop Equipment
A step-by-step technical guide to building a closed-loop filament recycling system using a desktop shredder and filament extruder. Covers each stage from plastic scrap to printable filament spool, with process parameters, quality benchmarks, and a realistic cost model.

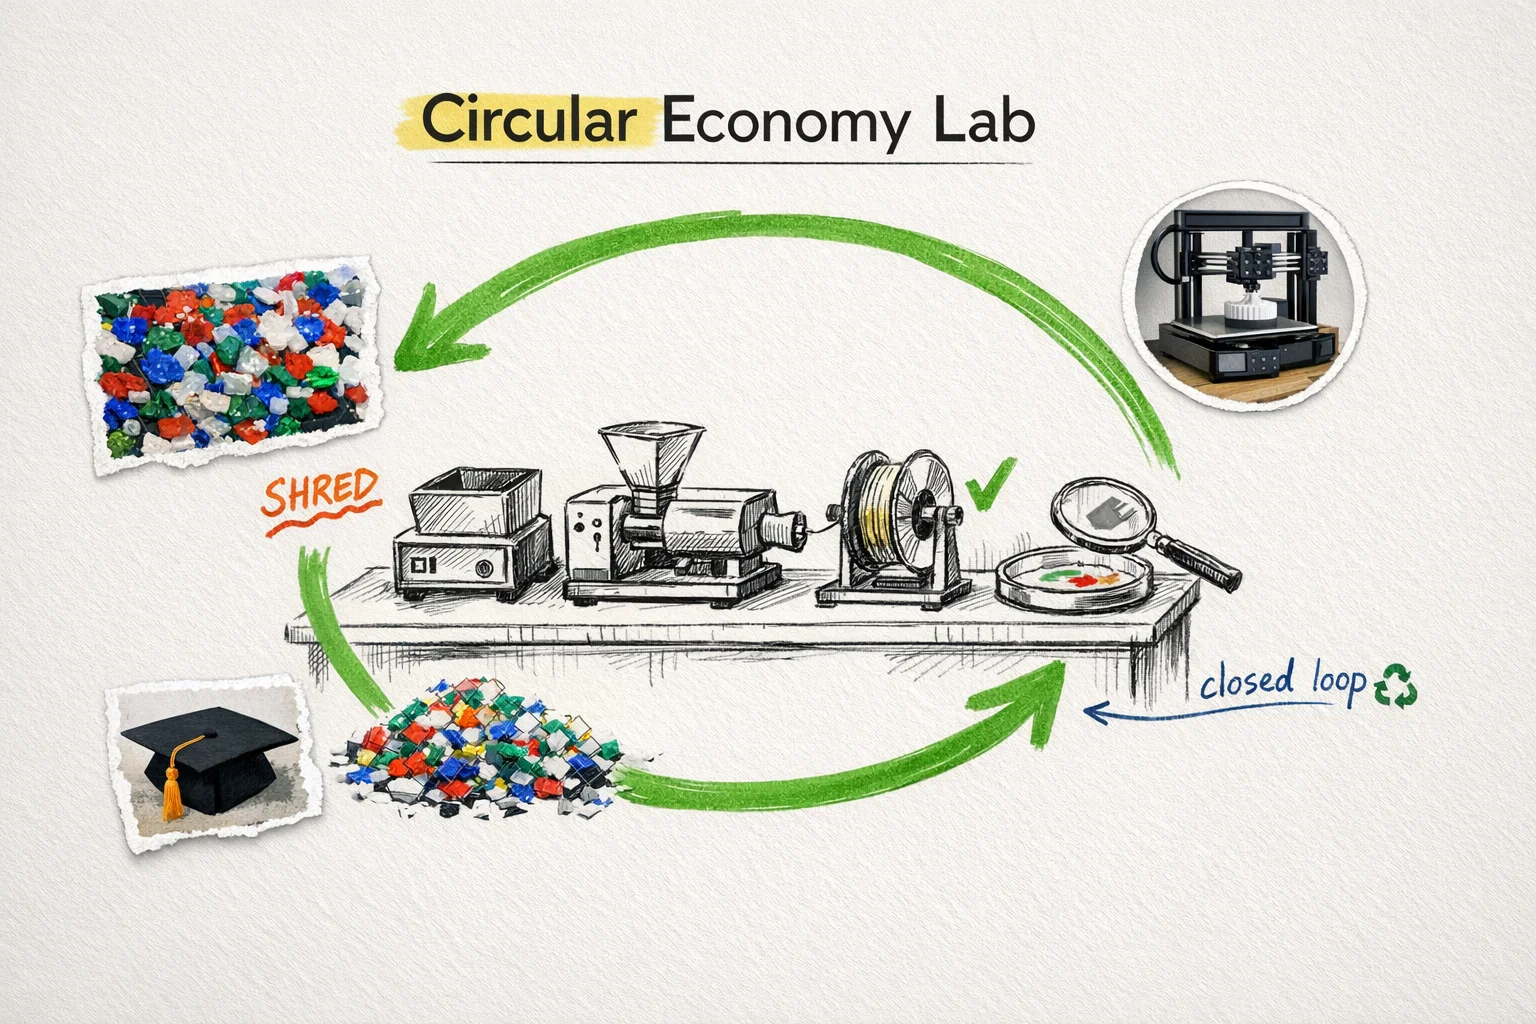
A community makerspace in Portland, Oregon, set out to answer a question that most 3D printing facilities never bother asking: What would it take to turn our own printing waste back into usable filament?
Their operation ran 16 FDM printers producing parts for local small businesses, educational workshops, and member projects. Monthly filament consumption averaged 25 kg, with roughly 4–5 kg going to waste — failed prints, support structures, calibration models, and color purge blocks. At $25/kg for decent PLA filament, that waste bin represented about $1,200–1,500 per year in discarded material.
In early 2025, they assembled a compact recycling station: a mini desktop shredder for size reduction, a food dehydrator for drying, and a desktop filament extruder for re-extrusion. Total bench space: under 2 m². Within three months of operation, they had established a repeatable workflow that converted roughly 70% of their PLA waste back into printable 1.75 mm filament. The remaining 30% — mixed-color batches, contaminated pieces, and sub-spec filament — went into injection molding demos rather than the trash.
The recycled filament was not identical to virgin. Diameter consistency ran ±0.05 mm compared to ±0.02 mm for commercial spool. Color was limited to whatever the scrap pile produced — mostly a warm gray from mixed colors. But for functional prototypes, jigs, fixtures, and educational prints, the material performed reliably. The makerspace estimated they recovered $800–1,000 in filament value during the first year, while also building a hands-on sustainability program that became their most popular member workshop.
This guide documents the complete workflow they developed — and that dozens of other labs and makerspaces have since adopted — from raw scrap to finished spool.
The Equipment Chain: What You Actually Need
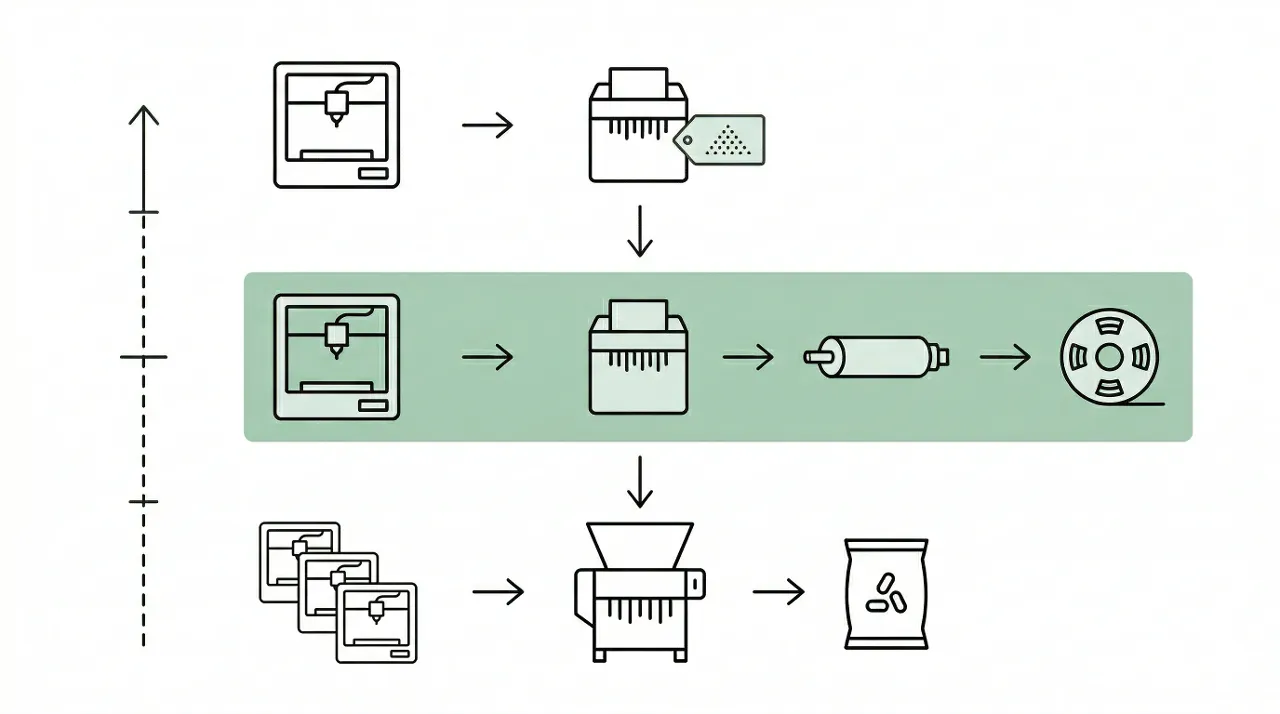
A closed-loop filament recycling system consists of five functional stages. Not all stages require dedicated equipment — some can be handled with tools you already own.
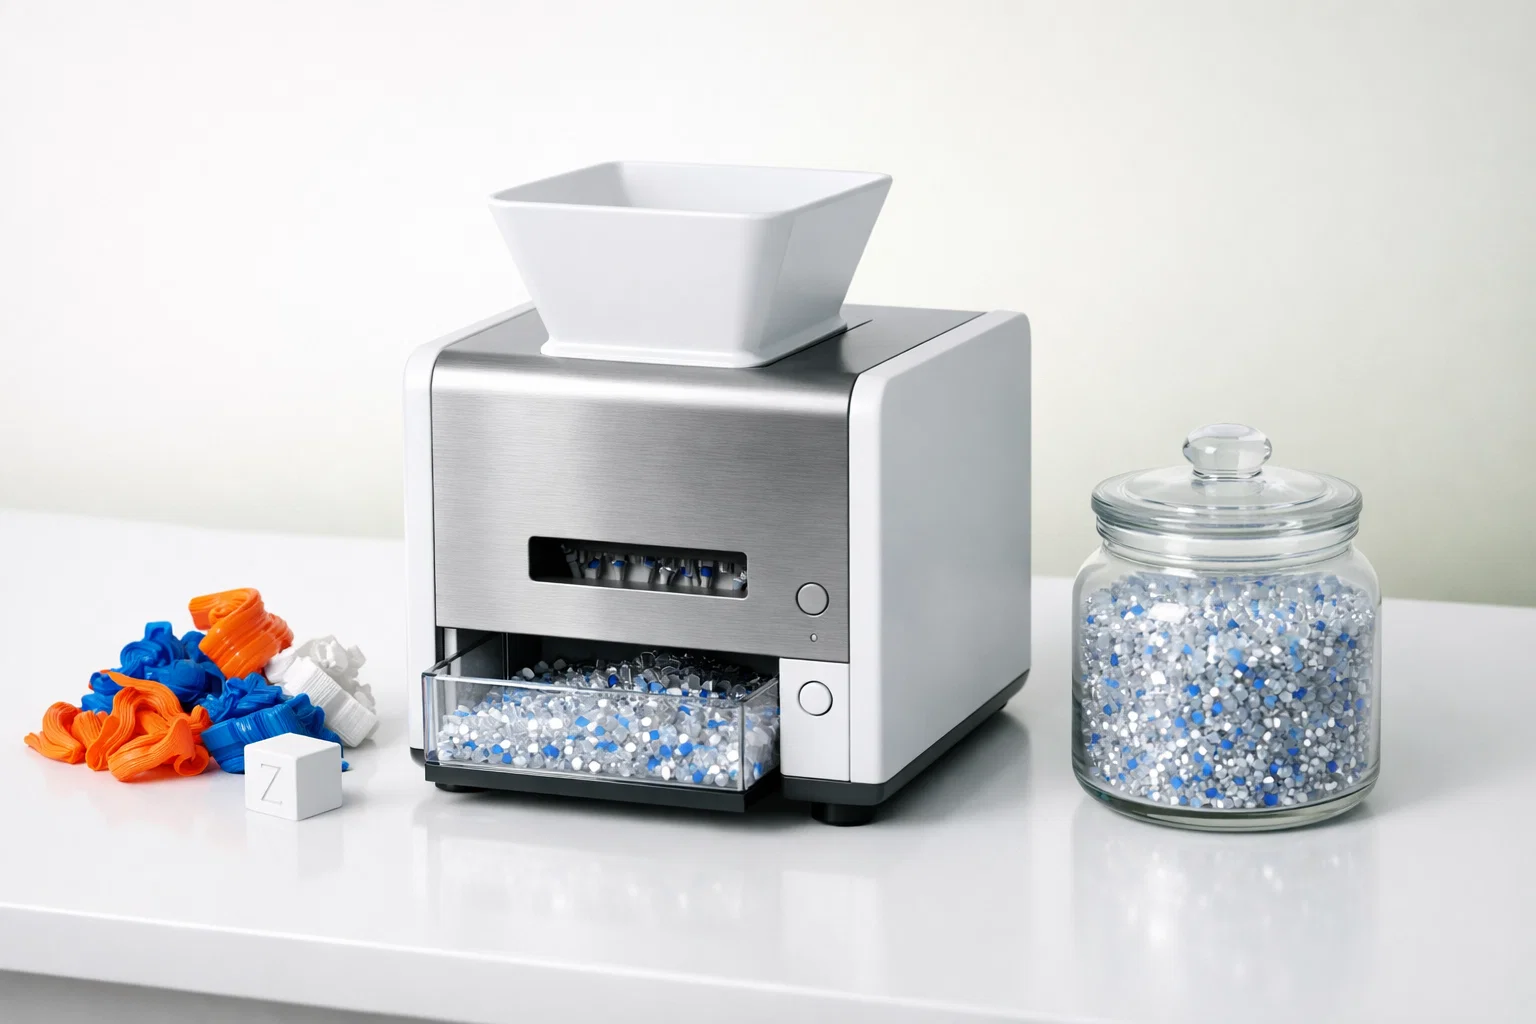
Stage 1: Size Reduction — Desktop Shredder (Required)
The shredder converts scrap plastic into granules small enough to feed an extruder hopper. This is the first and most critical piece of equipment in the chain, because everything downstream depends on consistent particle size.
Key requirements for this application:
- Output particle size of 3–6 mm (the sweet spot for most desktop filament extruder feed screws)
- Forward/reverse motor control for clearing jams without opening the cutting chamber
- Quiet operation for shared workspace environments
The Rumtoo mini desktop shredder is configured specifically for this use case: a 1.5 kW geared drive producing 3–6 mm regrind through interchangeable knife sets, with a noise floor below 55 dB. The unit ships with two blade configurations — Set A (5 mm spacing, 22+22 blades) for general-purpose regrind and Set B (3 mm spacing, 36+36 blades) for finer output preferred by small-diameter extruder screws.
Throughput reality check: At 1–5 kg/h, shredding 5 kg of monthly waste takes 1–3 hours total. This is not a continuous-operation machine — it is a batch tool used a few times per week.
Stage 2: Screening (Recommended)
Raw shredder output contains a particle size distribution, not a single uniform size. For most filament extruders, the ideal feed range is 3–6 mm. Particles outside this range cause problems:
- Oversized pieces (>8 mm): Bridge in the hopper throat or feed inconsistently into the screw, causing surging and diameter variation.
- Fines and dust (<2 mm): Melt prematurely in the feed zone, form clumps, and create hot spots that degrade the polymer.
A stacked pair of mesh sieves — 8 mm on top, 3 mm on bottom — separates the output into three fractions. The 3–8 mm middle fraction is your usable feed. Oversize goes back through the shredder. Fines can be collected for injection molding use or discarded.
Cost: Stainless steel test sieves cost $15–30 each. A manual sieve shaker costs $50–100. This is the cheapest stage in the entire chain and has a disproportionate impact on filament quality.
Stage 3: Drying (Required for PETG/Nylon, Recommended for PLA)
Moisture is the single biggest cause of filament quality failure in recycling workflows. Water molecules trapped in polymer granules turn to steam during extrusion, creating internal bubbles that cause brittle filament, inconsistent diameter, and rough surface texture.
| Material | Drying Temperature | Minimum Drying Time | Target Moisture Content |
|---|---|---|---|
| PLA | 50–55 °C | 2–4 hours | < 0.05% |
| PETG | 65 °C | 4–6 hours | < 0.02% |
| ABS | 80 °C | 2–4 hours | < 0.03% |
| Nylon (PA) | 80–85 °C | 8–12 hours | < 0.01% |
Equipment options, from budget to dedicated:
- Food dehydrator ($30–80): Works surprisingly well for PLA. Set to the appropriate temperature, spread granules in a single layer on the trays, and run for the prescribed time. Limitation: temperature control is imprecise, and capacity is limited to 1–2 kg per batch.
- Laboratory oven ($200–500): More precise temperature control and larger capacity. Ideal for facilities processing multiple materials that require different drying temperatures.
- Dedicated pellet/granule dryer ($500–2,000): Purpose-built with forced air circulation, precise PID temperature control, and hopper designs that feed directly into the extruder. The right choice for facilities running daily recycling operations.
Critical rule: Always dry regrind immediately before extrusion, even if it was dried previously. Polymer granules reabsorb atmospheric moisture within hours, especially in humid environments. If dried regrind has been sitting in an open container for more than 4 hours, dry it again.
Stage 4: Filament Extrusion (Required)
The extruder melts regrind granules and pushes the molten polymer through a precision die to form continuous filament at a target diameter — typically 1.75 mm or 2.85 mm.
Key extrusion parameters by material:
| Parameter | PLA | PETG | ABS |
|---|---|---|---|
| Barrel temperature | 170–190 °C | 230–250 °C | 210–240 °C |
| Die temperature | 175–185 °C | 235–245 °C | 220–235 °C |
| Screw speed | Material-dependent — start slow, increase gradually | ||
| Target diameter | 1.75 ± 0.05 mm | 1.75 ± 0.05 mm | 1.75 ± 0.05 mm |
| Puller speed | Adjusted to maintain target diameter |
The virgin/recycled blend strategy: If you are new to filament recycling, start with a 70/30 blend — 70% recycled regrind and 30% virgin pellets. Virgin pellets have consistent melt flow properties that stabilize the extrusion process and compensate for the slight molecular weight reduction in recycled material. As you gain experience and confidence in your regrind quality, gradually increase the recycled fraction. Many experienced operators run 100% recycled PLA without issues once their sorting and drying processes are dialed in.
Common extrusion problems and fixes:
| Symptom | Likely Cause | Fix |
|---|---|---|
| Bubbles in filament | Moisture in regrind | Dry longer or at higher temperature |
| Diameter surging (thick-thin-thick) | Inconsistent particle size | Screen regrind more carefully; remove fines |
| Rough, matte surface | Temperature too low or moisture | Increase barrel temp by 5 °C increments; verify drying |
| Filament snaps easily | Polymer degradation or contamination | Check for mixed materials; reduce processing temperature |
| Filament curls after die | Die temperature too high | Reduce die temp by 5 °C; increase cooling airflow |
| Hopper bridging | Regrind particles too large or irregular | Use finer blade set (Set B); re-shred oversized pieces |
Rumtoo’s desktop filament extruders are designed to accept regrind directly — the hopper geometry and screw profile are optimized for irregular granule shapes, not just uniform commercial pellets. This matters because recycled regrind has lower bulk density and more varied particle geometry than virgin pellets, and extruders designed exclusively for pellets often struggle with regrind feeding consistency.
Stage 5: Winding (Recommended)
After extrusion, the filament needs to be collected on a spool. This can be done manually (tedious and prone to tangling) or with a winding station.
Manual winding works for very small batches. Extrude filament onto a flat surface in loose coils, then hand-wind onto an empty spool. Practical for up to 200–300 g batches.
Automated winding uses a motorized spool holder with adjustable tension and a traverse mechanism that distributes the filament evenly across the spool width. This produces neat, tangle-free spools that feed reliably through the printer’s filament path. For any operation producing more than 500 g of filament per session, a winding station saves significant labor and eliminates the most common printing failure with recycled filament: mid-print tangles from poorly wound spools.
The Complete Workflow: Start to Finish
Here is the full process as a step-by-step sequence, with approximate time requirements for a 2 kg batch of PLA scrap.
Step 1: Sort (15 minutes) Separate scrap by material type. Remove parts with metal inserts, adhesive labels, or non-plastic components. Optionally sort by color if you want single-color filament output.
Step 2: Pre-cut (10 minutes) Cut pieces larger than 120 × 200 mm to fit the shredder feed opening. A pair of heavy-duty scissors or a band saw handles this quickly.
Step 3: Shred (30–60 minutes) Feed prepared pieces into the desktop shredder at a steady rate. Collect the 3–6 mm regrind output in a clean container.
Step 4: Screen (10 minutes) Pass regrind through stacked sieves. Retain the 3–8 mm fraction. Re-shred oversize pieces. Set aside fines.
Step 5: Dry (2–6 hours, mostly unattended) Load screened regrind into a dehydrator or oven at the appropriate temperature for the material type. This step runs unattended — set it and walk away.
Step 6: Extrude (60–90 minutes) Load dried regrind into the extruder hopper. Bring the extruder to operating temperature (10–15 minute warm-up). Begin extrusion at low screw speed, gradually increasing while monitoring filament diameter. Adjust puller speed to maintain 1.75 ± 0.05 mm.
Step 7: Wind (concurrent with extrusion) If using a winding station, filament spools automatically during extrusion. If winding manually, coil filament loosely during extrusion and hand-wind onto a spool after the batch is complete.
Step 8: Quality check (5 minutes) Measure filament diameter at 5–10 points along the spool using a digital caliper. Check for surface defects, bubbles, and brittleness by bending a short sample. Label the spool with material type, date, and any blend ratio.
Total active labor for a 2 kg PLA batch: approximately 2–3 hours. Total elapsed time including drying: approximately 4–8 hours. Filament output from 2 kg regrind: approximately 1.4–1.7 kg (accounting for process losses from fines, startup purge, and sub-spec sections).
Quality Benchmarks: Recycled vs Virgin Filament
Setting realistic expectations for recycled filament prevents disappointment and guides appropriate use.
Dimensional Accuracy
| Metric | Virgin Commercial Filament | Recycled Desktop Filament |
|---|---|---|
| Diameter tolerance | ±0.02 mm | ±0.05 mm (achievable with practice) |
| Ovality | < 1% | < 3% |
| Consistency over 100 m | Excellent | Good (occasional minor deviations) |
A ±0.05 mm tolerance is adequate for most FDM printing. Modern slicers compensate for minor diameter variation through flow rate adjustment. Prints made with recycled filament at this tolerance are functionally indistinguishable from virgin filament prints for prototyping, tooling, and non-cosmetic applications.
Mechanical Properties
Published research on PLA recycling shows the following trends through successive recycling passes:
| Property | Virgin PLA | 1st Recycle | 2nd Recycle | 3rd Recycle |
|---|---|---|---|---|
| Tensile strength | ~60 MPa | ~52–57 MPa | ~48–53 MPa | ~43–48 MPa |
| Elongation at break | ~4–6% | ~3–5% | ~2.5–4% | ~2–3.5% |
| Impact resistance | Baseline | ~90% of baseline | ~80% of baseline | ~70% of baseline |
The first recycling pass preserves 85–95% of original tensile strength — a negligible reduction for prototyping, jigs, fixtures, and educational projects. By the third pass, the material is still printable but noticeably more brittle. Blending 30–50% virgin pellets at any recycling stage resets the property curve close to virgin levels.
Appropriate Applications for Recycled Filament
Well-suited:
- Functional prototypes and concept models
- Jigs, fixtures, and assembly aids
- Educational prints and classroom projects
- Non-structural enclosures and housings
- Art installations and display pieces
- Injection molding test feedstock
Use with caution:
- Load-bearing structural components (test before committing)
- Parts requiring precise dimensional accuracy (measure the printed result)
- Long-term outdoor exposure (UV stability may be reduced)
Not recommended:
- Food-contact applications (recycling process does not certify food safety)
- Medical or safety-critical components
- Applications requiring certified material properties
Cost Model: Is the Investment Worth It?
Equipment Investment
| Component | Budget Option | Mid-Range Option |
|---|---|---|
| Desktop shredder | — | Rumtoo mini desktop shredder |
| Sieves (set of 2) | $30–60 | $30–60 |
| Drying solution | $40–80 (food dehydrator) | $300–500 (lab oven) |
| Filament extruder | — | Rumtoo desktop extruder |
| Winding station | $0 (manual) | $200–500 (motorized) |
Monthly Operating Costs
| Item | Cost |
|---|---|
| Electricity (shredder + extruder, ~4 hours/month) | $1–3 |
| Blade maintenance (amortized over 300+ hours) | $5–10 |
| Desiccant replacement | $2–5 |
| Extruder nozzle/die wear (amortized) | $5–15 |
| Total monthly operating cost | $13–33 |
Revenue / Savings Model
| Scenario | Monthly Scrap | Filament Recovered | Value at $25/kg | Annual Savings |
|---|---|---|---|---|
| Small lab (4–6 printers) | 2–3 kg | 1.5–2 kg | $38–50 | $450–600 |
| Medium makerspace (10–16 printers) | 5–8 kg | 3.5–6 kg | $88–150 | $1,050–1,800 |
| Print farm (30–50 printers) | 15–25 kg | 10–18 kg | $250–450 | $3,000–5,400 |
Payback Period
For a medium-sized makerspace saving $100–150/month in filament costs against a total equipment investment in the low thousands, the break-even point falls in the 8–18 month range. Print farms with higher waste volumes can reach payback in under 6 months.
The financial case is strongest when the recycled filament directly displaces new filament purchases. If recycled filament is used only for secondary applications (testing, demos, donations), the direct financial return is lower — but the educational, sustainability reporting, and community engagement value often justifies the investment independently.
Scaling Up: When Desktop Is No Longer Enough
The desktop filament recycling workflow described here is designed for operations processing up to 20–30 kg of scrap per month. Beyond that volume, two bottlenecks emerge:
Shredding time becomes significant. At 30 kg/month and 3 kg/h average throughput, shredding alone requires 10 hours per month — nearly 30 minutes per working day. The process remains feasible, but it shifts from an occasional batch task to a daily operational commitment.
Extrusion capacity limits output. Desktop filament extruders typically produce 300–800 g/hour. Processing 30 kg of regrind into filament requires 40–100 hours of extrusion time per month.
When these time commitments outgrow your available labor, the next step is not necessarily a larger shredder — it is evaluating whether your operation has grown to the point where industrial-scale recycling equipment and a pelletizing line make sense. At that stage, the output shifts from filament spools to recycled pellets, which can be sold to filament manufacturers or used in industrial extrusion and injection molding. The desktop shredder transitions into an R&D and QC role — preparing test batches, validating new material streams, and providing controlled samples for quality verification.
See our guide on desktop vs industrial shredders for a detailed comparison of when to make this transition.
Frequently Asked Questions
What is the minimum waste volume that makes filament recycling worthwhile?
From a pure cost perspective, operations generating at least 3–5 kg of single-material scrap per month will see meaningful filament savings. Below that volume, the time spent sorting, shredding, and extruding may not justify the effort for cost savings alone. However, many labs and makerspaces with smaller waste volumes run recycling programs primarily for their educational and sustainability value — in which case even 1–2 kg/month of processed scrap serves its purpose.
Can I mix recycled regrind with virgin pellets in the extruder?
Yes, and this is the recommended approach for beginners. A 70/30 recycled-to-virgin blend stabilizes the extrusion process and produces filament with properties closer to commercial-grade. Virgin pellets are available from polymer distributors at $5–15/kg — significantly cheaper than finished filament — so blending still offers substantial cost savings over buying all-new filament.
What diameter tolerance is achievable with desktop equipment?
With careful process control — consistent regrind particle size, proper drying, stable extrusion temperature, and calibrated puller speed — a tolerance of ±0.05 mm on 1.75 mm filament is consistently achievable. This is wider than commercial filament (±0.02 mm) but adequate for the vast majority of FDM printing applications.
How many times can PLA be recycled before the material is unusable?
Research indicates PLA can undergo 3–5 mechanical recycling passes (shred → extrude → print → repeat) before tensile strength degrades to the point where the filament becomes too brittle for reliable printing. Blending with 30–50% virgin material at each pass extends the usable lifecycle significantly. In practice, most makerspace operations blend at some ratio anyway, so material degradation is rarely the limiting factor.
Does the shredder need to match the extruder brand?
No. The interface between shredder and extruder is simply regrind particle size. Any shredder producing 3–6 mm granules will feed any desktop filament extruder designed to accept regrind. The Rumtoo mini desktop shredder is compatible with all major desktop extrusion systems. The more important compatibility question is whether the extruder’s hopper and screw design can handle the irregular particle shapes and lower bulk density of regrind (versus uniform commercial pellets) — not all extruders are designed for this.
Next Steps
If you are ready to build a filament recycling workflow, start with two measurements: your monthly scrap volume by material type, and the filament diameter your printers use. These two numbers determine the shredder blade configuration and extruder die selection.
Send your material mix, monthly volume, and target filament diameter to the Rumtoo process team. We can recommend a matched shredder and extruder configuration, including blade set selection and extrusion parameter starting points for your specific materials.
Related pages:
- filament recycling
- desktop shredder
- filament extruder
- circular economy
- 3D printing recycling